3M Paint Protection Film: Expert Installation Guide for Maximum Vehicle Protection
Paint protection film (PPF) has revolutionized how vehicle owners safeguard their automotive investments. 3M paint protection film stands as the industry gold standard, offering advanced technology that shields your vehicle’s exterior from environmental hazards, road debris, and oxidation. Whether you’re protecting a luxury sports car or a daily driver, understanding proper installation techniques ensures optimal performance and longevity of this premium protective layer.
This comprehensive guide walks you through everything you need to know about 3M paint protection film installation, from surface preparation to maintenance protocols. Professional installers and DIY enthusiasts alike will benefit from these expert insights that combine industry best practices with technical specifications.
Understanding 3M Paint Protection Film Technology
3M paint protection film represents decades of automotive protection innovation. The film consists of multiple layers engineered to absorb impact energy, preventing stone chips, road salt corrosion, and UV damage from compromising your vehicle’s paint. The self-healing topcoat layer automatically repairs minor scratches and swirl marks when exposed to heat, maintaining a flawless appearance over time.
The advanced adhesive system used in 3M PPF creates a permanent bond with your vehicle’s clear coat without damaging the original paint. Unlike inferior films that yellow or become brittle, 3M’s proprietary formulation maintains optical clarity indefinitely. The film’s thickness, typically measured in millimeters, determines protection level and durability. Premium formulations offer superior edge securement, preventing peeling or lifting at film boundaries.
Understanding the composition of paint protection film helps you appreciate why professional installation matters. The urethane-based material requires precise temperature control, humidity management, and application pressure to achieve proper molecular bonding with the vehicle’s surface. When applied correctly, the film becomes virtually invisible while providing comprehensive protection against environmental threats.
Pre-Installation Surface Preparation
Successful paint protection film installation begins with meticulous surface preparation. This critical phase determines whether your investment will deliver maximum protection and longevity. The process involves removing contaminants, correcting paint defects, and creating an optimal adhesive bonding surface.
Clay bar treatment represents the first essential step. This removes embedded contaminants like industrial fallout, tree sap, and brake dust that regular washing cannot eliminate. Using a lubricant spray, gently glide the clay bar across the paint surface using straight-line motions. Pay particular attention to areas exposed to highway driving, which accumulate more airborne particles.
Paint correction follows clay bar treatment. Professional installers use machine polishers to remove minor scratches, swirl marks, and oxidation. This step ensures the paint surface presents perfectly smooth, creating maximum adhesive contact area. The correction process involves progressively finer abrasive pads, starting with aggressive compounds for significant defects and finishing with polish for a pristine surface.
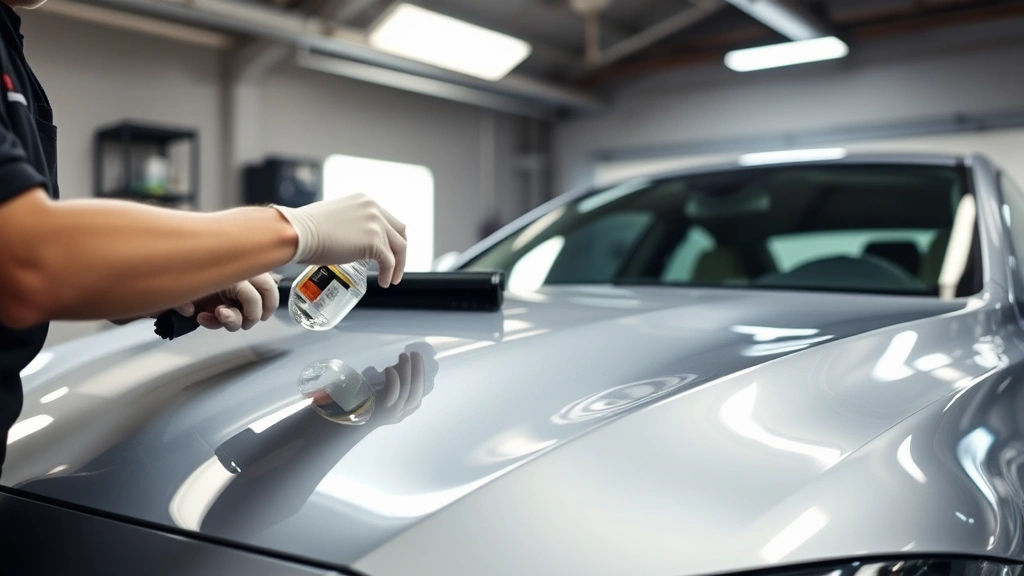
Decontamination and final preparation involve washing with specialized automotive soap and distilled water. This removes all traces of clay residue, polish compounds, and environmental contaminants. Some professionals use isopropyl alcohol wipes as a final pre-application step, ensuring zero residue remains on the paint surface. Temperature control becomes critical at this stage—the ideal installation environment maintains 65-75°F with 40-50% humidity.
Professional Installation Process
Professional 3M paint protection film installation requires specialized equipment, training, and environmental controls. The process differs significantly from DIY approaches, incorporating precision techniques that ensure optimal results and warranty compliance. Professional installers complete extensive training programs covering film properties, application techniques, and quality assurance standards.
The installation workspace must meet specific environmental requirements. Climate-controlled facilities maintain consistent temperature and humidity levels throughout the application process. Dust-free environments prevent particle contamination that could compromise adhesion or create visible imperfections beneath the film. Professional installers use specialized lighting systems to identify any surface imperfections before application begins.
Film measurement and cutting precedes actual application. Installers create custom patterns matching your vehicle’s specific dimensions and contours. Advanced cutting systems ensure precise edges that align perfectly with vehicle panels, trim lines, and curves. This customization prevents overlapping seams and ensures seamless protection across all protected surfaces.
The application process itself involves carefully positioning the film while maintaining a slip layer between the adhesive and paint surface. Installers use squeegees to gradually remove air bubbles and excess application fluid, working from the center outward. This technique requires patience and precision—rushing the process creates trapped air pockets or wrinkles that compromise appearance and protection.
Application Techniques and Best Practices
Mastering application techniques separates professional results from amateur installations. Experienced installers employ specific methods that ensure proper adhesive bonding, eliminate air bubbles, and create seamless transitions between film sections.
Slip solution application maintains film mobility during positioning. This mixture of water and soap allows the installer to adjust the film’s position before the adhesive sets. As the solution evaporates, the adhesive gradually activates, creating permanent bonding. Premature solution evaporation prevents repositioning, while excessive solution application extends drying time unnecessarily.
Squeegee pressure and technique directly impact installation quality. Installers use specialized squeegees with appropriate hardness ratings for different film types. Applying consistent, moderate pressure removes excess solution and air bubbles without damaging the film or underlying paint. Working in overlapping passes, from center outward, creates professional results. Temperature-controlled squeegees sometimes enhance adhesive activation, particularly in cooler environments.
Edge sealing represents a critical step often overlooked by inexperienced installers. Properly sealed edges prevent moisture penetration and film lifting at boundaries. Professional-grade edge sealers create waterproof barriers that protect adhesive interfaces from environmental exposure. This step significantly extends film lifespan and prevents edge failure that compromises the entire installation.
Thermal post-curing accelerates adhesive curing and enhances bonding strength. After installation, applying controlled heat with heat guns or thermal chambers activates the adhesive more completely. This process reduces curing time and increases adhesive strength, creating superior long-term performance. Temperature control remains essential—excessive heat damages the film or causes wrinkling.
Common Installation Mistakes to Avoid
Understanding common installation errors helps both professionals and DIY enthusiasts achieve better results. These mistakes compromise protection effectiveness, appearance, and film longevity.
Inadequate surface preparation represents the most prevalent installation error. Skipping clay bar treatment, paint correction, or final decontamination creates adhesive bonding issues. Contaminants prevent proper molecular bonding, resulting in premature peeling or lifting. This mistake often appears weeks or months after installation when adhesive fails to maintain sufficient grip strength.
Improper environmental conditions cause numerous problems. Installing film in cold temperatures slows adhesive activation, preventing proper bonding. High humidity or dusty environments introduce moisture or particles that create visible defects. Professional installers maintain controlled environments specifically to prevent these issues—DIY installations in garages or outdoor settings frequently encounter environmental challenges.
Excessive squeegee pressure damages the film or traps air bubbles beneath the surface. Conversely, insufficient pressure leaves excess solution or air pockets that compromise appearance and protection. Finding the appropriate pressure balance requires experience and practice. Professional installers develop intuitive pressure control through extensive training and repetitive application.
Rushing the curing process causes adhesive failure. Some installers apply protective coatings or expose vehicles to moisture too quickly, before adhesive fully cures. This premature exposure prevents complete adhesive hardening, resulting in edge lifting or film separation. Respecting manufacturer-recommended curing times ensures optimal adhesive strength.
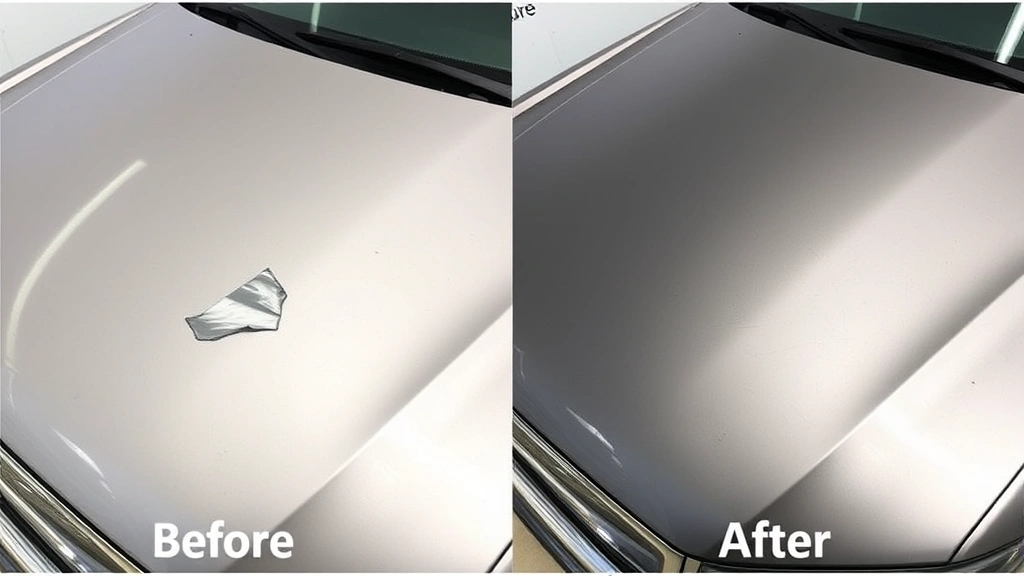
Incorrect film cutting or alignment creates visible seams or inadequate coverage. Custom-cut film must align precisely with vehicle contours and panel boundaries. Misalignment creates obvious lines or leaves unprotected areas vulnerable to damage. Professional cutting systems and experienced installers ensure perfect alignment that’s virtually invisible.
Post-Installation Care and Maintenance
Proper post-installation care maximizes 3M paint protection film longevity and performance. The first 48 hours represent a critical curing period during which adhesive continues hardening and bonding strength increases. Avoiding vehicle washing, waxing, or exposure to moisture during this window protects the installation.
Once fully cured, regular maintenance preserves film clarity and protective properties. Gentle hand washing with soft microfiber cloths and pH-neutral soap prevents scratching or damaging the film surface. Avoid aggressive brushes or automatic car washes that may catch film edges or apply excessive pressure. The self-healing topcoat handles minor scratches, but preventing damage remains preferable to relying on self-healing properties.
Ceramic coatings applied over paint protection film provide additional gloss enhancement and hydrophobic properties. These professional-grade coatings create beading water and repelling contaminants, simplifying maintenance. Ceramic coating application must occur after complete PPF curing, typically 5-7 days post-installation. Consult our ScreenVibe Daily Blog for comprehensive automotive care insights.
Avoiding harsh chemicals, abrasive cleaners, or polishing compounds protects film integrity. These products may damage the topcoat or compromise adhesive performance. Stick with automotive-specific cleaning products formulated for protective film compatibility. Regular maintenance prevents contamination buildup that dulls film appearance or creates maintenance challenges.
Troubleshooting Installation Issues
Even professional installations occasionally encounter challenges requiring troubleshooting expertise. Understanding common issues and appropriate solutions helps address problems effectively.
Trapped air bubbles sometimes appear after installation, particularly in textured or complex curved areas. Small bubbles often disappear as adhesive fully cures and settles. Larger persistent bubbles may require pricking with sterile needles and re-squeegeeing to remove trapped air. This process demands careful technique to avoid creating larger defects.
Edge lifting occurs when adhesive bonding fails at film boundaries. This typically results from inadequate surface preparation, insufficient edge sealing, or premature moisture exposure. Addressing edge lifting requires professional intervention—attempting DIY repairs risks damaging the entire installation. Prevention through proper edge sealing prevents this costly problem.
Hazing or cloudiness sometimes develops beneath the film, typically indicating moisture trapped during installation. This occurs when installation occurs in high-humidity environments or excessive slip solution remains beneath the film. Proper environmental controls and thorough solution removal during installation prevent this issue. Once developed, hazing typically requires professional remediation.
Film wrinkling appears as subtle creases or distortions in the film surface. This usually results from improper application technique, inadequate heat curing, or excessive film stretching during installation. Preventing wrinkling requires proper thermal post-curing and careful technique during application. Professional installers rarely encounter this issue due to their refined technique.
Premature edge peeling indicates adhesive failure at film boundaries. This typically develops weeks or months after installation, suggesting inadequate edge sealing or surface preparation. Addressing this issue requires professional re-installation of affected areas. Prevention through proper edge sealing and surface preparation remains far more effective than remediation.
FAQ
How long does 3M paint protection film last?
Premium 3M paint protection film provides 5-10 years of protection with proper care and maintenance. Some professional-grade formulations last 10-15 years. Lifespan depends on climate exposure, maintenance frequency, and installation quality. UV protection degrades gradually over time, though the film remains protective even as it ages. Professional installation and regular maintenance maximize longevity.
Can paint protection film be removed without damaging paint?
Professional removal of properly installed paint protection film rarely damages the underlying paint. Experienced technicians use specialized removal techniques and heat application to safely separate the film adhesive. DIY removal attempts frequently damage clear coat or base paint. Always consult professionals for removal, particularly if the film has been installed for extended periods.
Is DIY installation of 3M paint protection film recommended?
While possible, professional installation remains strongly recommended for optimal results. DIY installations frequently encounter environmental challenges, surface preparation issues, and application technique problems that compromise quality. Professional installers possess specialized equipment, training, and environmental controls that ensure superior results. The cost difference typically justifies professional installation for expensive vehicles.
Does paint protection film affect paint warranty coverage?
Properly installed paint protection film typically does not void manufacturer paint warranties. However, check specific warranty terms with your vehicle manufacturer. Professional installation from reputable providers usually includes warranty coverage for the film itself. Ensure your installer provides comprehensive warranty documentation covering adhesive failure, peeling, or delamination.
Can paint protection film be applied to all vehicle surfaces?
While paint protection film protects most exterior painted surfaces, certain areas present challenges. Complex curves, textured surfaces, and areas with numerous panel gaps may be difficult to cover seamlessly. Professional installers customize coverage patterns based on your vehicle’s specific design and your protection priorities. Full-body coverage costs more than partial coverage focusing on high-impact areas.
What’s the difference between self-healing and traditional paint protection film?
Self-healing paint protection film features a topcoat layer containing thermoplastic polyurethane that automatically repairs minor scratches and swirl marks when exposed to heat. Traditional film lacks this capability, with damage remaining permanent. Self-healing technology costs more but provides superior appearance maintenance and protection longevity. For comprehensive information about protection technologies, explore our guide on finding expert reviews and recommendations.
How much does professional 3M paint protection film installation cost?
Installation costs vary based on vehicle size, coverage area, and regional pricing. Partial coverage (front bumper, hood, mirrors) typically costs $500-$1,500. Full-body coverage ranges from $2,000-$8,000+ depending on vehicle complexity. Premium vehicles with complex curves cost more. Professional installation ensures optimal results and warranty coverage, justifying the investment compared to DIY approaches or inferior products.